
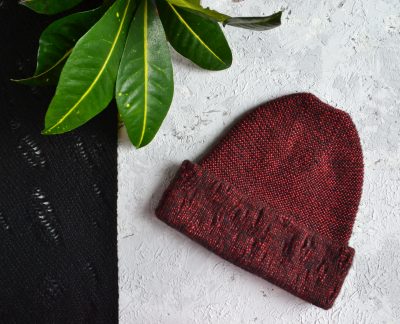
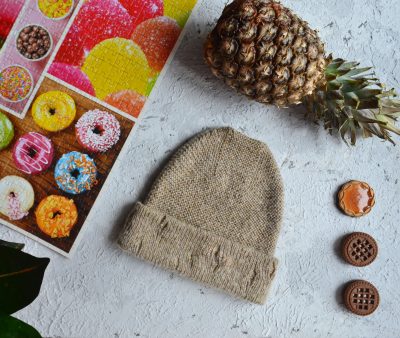
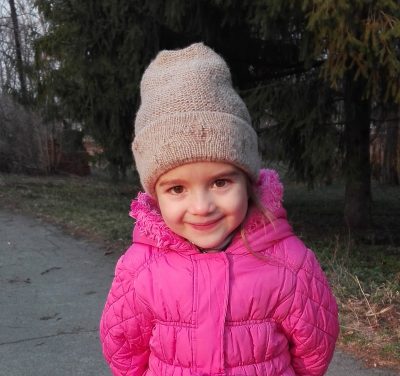
This hat will blow your brilliance! It is especially noticeable when the sun shines brightly. In the spring, you can shine!) And at the same time – a stylish torn model. Things in this style have already been called “Laksheri torn” or “Hipster holes.”


And so she glistens in the sun)
Perhaps I’ll start with the fact that Gazzal’s “Rock n roll” yarn was very mysterious to me from the very beginning) And even though I knitted more than one hat from it, I still don’t understand how to calculate the right amount of loops. By the fact that in the sample one digit is obtained, and if you type the same number of loops in 1 centimeter for the cap, then it does not at all correspond to the desired size … As much as I did not try, I had to tie up 3 times at least. And it was only by fitting that I managed to find an approximate formula for counting the loops for the cap.
Why approximate? Yes, because even for me, it does not always work out exactly. It is worth at least a little change the density of knitting, slightly loosen the loop – and a completely different result is obtained)
I knitted a sample of 30 loops, with the needles 3.5. And in an even, unstretched state in 10 centimeters, 24 loops are obtained. But if you tie a cap according to such calculations, following that there are 2.4 loops in one centimeter – it will be very big!
According to this, by the method of tests and bandaging, I found the required number of loops, according to which you can calculate the desired cap size. I have 1.7 loops in 1 centimeter.
How from 2.4 to get 1.7 you ask? I will answer honestly – there are no normal explanations for this) Therefore, the only thing I can say is to subtract 30 percent of the number of loops in 10 centimeters. This will be the required number of loops.
I repeat once again that this is personally my experience, and it is for knitting with the number 3.5. At the same time it is difficult to knit.
With this size of knitting needles, I have already knitted three caps, and I already wanted to try to take smaller knitting needles to knit more freely. I even began to knit one – but trying to put on a headless hat, I realized that it was too small. That’s why I stopped at number 3.5.
From this I can conclude that in order to get into my heading calculations, you need to have 24 loops in 10 centimeters. And choose the size of the needles for your knitting density.
The next cap on which I’ll take MK will be knit with number 3.5
!!! Attention !!! The cap should not sit on your head too loosely, due to the fact that in the process of wearing it will still stretch.
So, the descriptions will be in 3 sizes – 52 (54, 57).
To work you need:
– 2 (3, 3) Gazzal “Rock n roll” yarn;
– additional thread for a set of loops;
– circular and stocking knitting needles of suitable size for your knitting density (No. 3 – 3.5,);
– additional circular needles of suitable size;
– hook for dialing and closing loops;
– scissors;
– needle for tightening the tips of the threads.
For example, size 52 I will do calculations:
24 loops = 10 centimeters wide. 24 – 30% = 17 loops.
17/10 = 1.7 loops in centimeters.
1.7 * 52 = 88.4 loops, rounded to 88.
Conventionally, knitting hats can be divided into 5 stages:
- On the thread with a hook, we collect 88 (92, 98) loops, and we knit in a circle 27 (28, 29) rows with a front satin stitch.
- Then, the next 27 (28, 29) rows of the front smooth surface are knitted with holes in a random order with the help of lowered loops, we get a total of 54 (56, 58) rows.
- Next, we dismiss the thread and at the same time we change the loops from it to additional needles. We knit a series of two loops together, simultaneously with the main and additional knitting needles, one loop each. Thus we connect the two edges of the web into one (we get a fixed lapel). Next, knit another 28 (29, 30) rows of the front surface.
- After that, turn the cap on the wrong side, and knit the front row in the other direction, first fixing the thread (get one loop from the previous row, and put it on the right knitting needle not knit, at the end of this row we knit two loops together). The next row of knit purl, and then alternate with the front (garter stitch). So we knit 39 rows.
- And in 40 – purl, we begin to cut the loop for the crown:
- 5 loops with purses, 2 loops together with purses with an inclination to the left, 30 (32) loops with entrances, 2 loops together with purses with an inclination to the right, 10 loops with wrong loops, 2 loops together with purses with an inclination to the left, 30 (32, 84) loops of the loops (for the size 57, we subtract 2 times, at the beginning and at the end of the row) 2 loops together with purses with an inclination to the right, 5 purl loops;
- all loops are facial;
- 5 loops, side loops, 2 loops together with side loops with inclination to the left, 28 (30, 34) loops with side loops, 2 loops together with side loops with inclination to the right, 10 loops with side loops, 2 loops with side loops with inclination to the left, 28 (30, 34) , 2 loops together purl with a tilt to the right, 5 purl loops;
- all loops are facial;
- 5 loops, side loops, 2 loops together with side loops with inclination to the left, 26 (28, 32) loops with side loops, 2 loops together with side loops with inclination to the right, 10 loops with side loops, 2 loops with side loops with inclination to the left, 26 (28, 32) , 2 loops together purl with a tilt to the right, 5 purl loops;
- all loops are facial;
So we knit with additions in each purl row of 4 loops, alternating with the front rows, until the moment when the needles have 24 loops left (6 loops on each stocking knitting needle). The front row is not necessary to knit. These loops are closed with a hook from the inside of the cap.
The cap is ready!) It remains only to tighten the tips and hold the BTO (wet – heat treatment)
I wish you a pleasant viewing, and do not forget to subscribe to my channel!)
![]()
Also put likes and write comments, I will be very pleased!))
Subscribe to my Instagram page: Many photos on Instagram
 (5 оценок, среднее: 5.00 из 5)